How To Treat A Curling Iron Burn
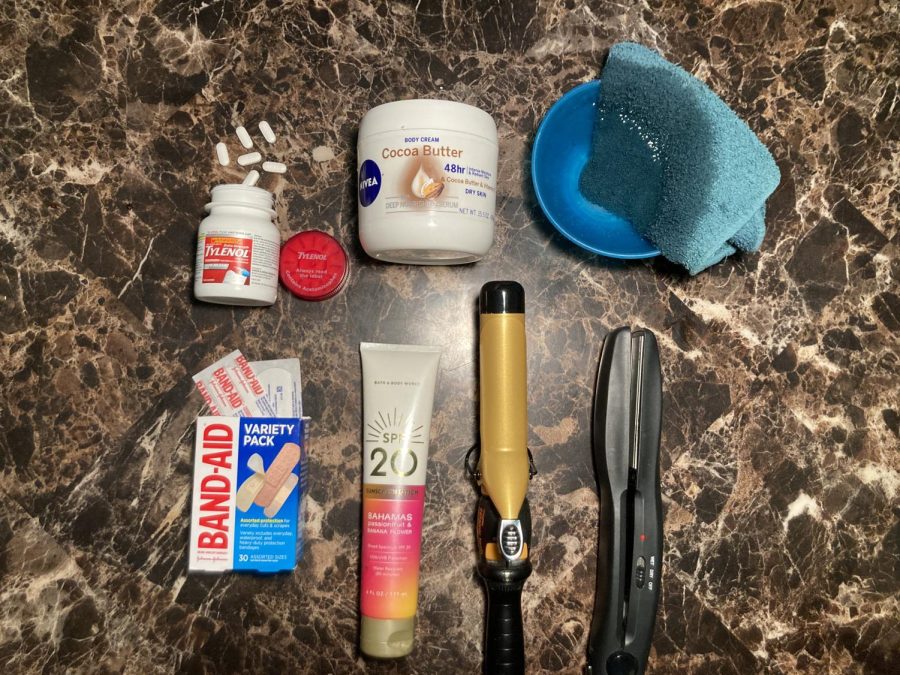
Photo by Jorja Janssen
It’s happened to all of us, we’re curling our hair and made one mistake. The next thing you know you’re yelling because the curling iron burned you. But what are you supposed to do? How are you supposed to safely treat the burn? This is where I come in to help. Most of the burns we get from curling irons or straighteners are first-degree burns, but if you don’t remove the object quickly it could turn into a second-degree burn.
So what is the difference between a first-degree burn and a second-degree burn? Well for starters a second-degree burn is much worse than a first-degree one. A first-degree burn is a burn on the outer layer of the skin. It can be painful and you may experience redness and some swollenness around the area of the burn, but it shouldn’t blister. A second-degree burn is more superficial, instead of burning just the outer layer of skin, it burns the second layer as well. You can experience severe pain, blisters, swelling, and the skin might look pink, white, red, or even mottled (which is splotches of colors). Second-degree burns may cause scarring.
There are six steps to take when treating a burn from a curling iron or a straightener.
1.) Cool down the burned area. make sure to use cool water not cold, using cold water can restrict the blood supply to the burn making the area worse. If the burn is on your hand, run it under cool water. But if you can’t get the burned area under the faucet then get a washcloth or rag get it wet with cool water and hold it on the burn. Hold the burn under cool water for at least 20 minutes, I know this sounds like a longer time than needed but the sooner you cool the burn down the less of an injury you will have.
2.) Moisturize the area. When you have completely cooled the burn down apply a moisturizing lotion to the area, this will allow for some relief and will refrain the area from becoming dry.
3.) Do not and I repeat DO NOT break the blister. I know it can be hard to not pop a blister but it is better for you to just leave them alone. The fluid within the blister actually protects you from any infection that you might get. If you happen to pop it or it just pops on its own clean it with water and antibiotic ointment, the water may sting the blistered area but after a little bit that feeling will subside.
4.) Bandage the burn. When treating a burn it is alright to put a bandaid on the area to protect it. However, you want to make sure that you’re not applying the bandaid too tightly and that you are not placing a cotton ball or any other fluffy cotton underneath the bandaid, this can result in cotton fibers getting into the burned area and could possibly cause infection.
5.) Medication. If none of these other tips have given you some or any relief you can always take over-the-counter medication. I suggest using Tylenol, aka Acetaminophen, for pain, or Advil, aka, ibuprofen, for pain and swelling. Make sure that you are reading the bottle for the correct dosage amount that you can take or talking to your doctor.
6.) Keeping the burned area protected. As the burn is getting to its final stages of the healing process make sure to apply moisturizer and sunscreen. This will protect the skin as it is still sensitive.
To prevent yourself from getting a burn while curling your hair you can do a couple of things. You should always make sure that you are keeping a safe distance between your head the hot iron and your fingers. Some people use bandaids but those don’t always work the best, I suggest heat-resistant gloves. There are many different kinds so I recommend that you research many different kinds and also look at the comments to find a pair of gloves that would suit your taste best. If gloves aren’t your style then try heat shields. They are like gloves but just for your fingers. Whatever you use I highly suggest that you do some research so that way you find the best product for you and that way you have a better idea of what you should look for and what you want.
Your donation will support the student journalists of Adel DeSoto Minburn High School. Your contribution will allow us to purchase equipment, attend conferences, and cover our annual website hosting costs.


![Rhyan Miller is the April student of the month. Miller is the daughter of Charity and Rich Miller, and has maintained a 3.925 GPA. Her three favorite classes in high school have been drama as literature, Prostart II, and news journalism. Miller participates in cross country, theater, individual and large group speech, the prostart team, student council, NHS, silver cord, and track. She feels that her experiences in those activities have made her more extroverted, sharing that she is "not afraid of [her] own voice anymore." Miller plans to attend Winona State University to major in psychology and minor in political science. Her advice to others is to "Fake it 'till you make it." She feels she was selected as student of the month due to her increased active presence in the classroom. She is also thankful for the good parking spot. In honor of her achievements, Raccoon Valley Bank has donated $100 to the ADM Scholarship Foundation.](https://blackandredgister.com/wp-content/uploads/2026/05/20260427_104331-600x450.jpg)